 Monitors
Although here at ColourProfiles we are mainly concerned with building profiles to get the most out of photographer's printers, we are constantly aware of the importantance of using good, well set up monitors to view photographs on before printing.
Getting your computer monitor to accurately display your photographs is absolutely crucial to good digital photography. Without knowing that your monitor correctly portrays the exact tones and colours in your image file it would be pointless trying to make any adjustments to the image at all.
Calibration and profiling
Setting up a monitor consists of two elements, calibration and profiling.
These two different aspects are often confused and misunderstood, sometimes both are often carried out in one process when hardware calibration takes place, so let's start by clarifying the two separate processes and what they do.
Calibration.
This process sets the monitor's settings adjusting the monitor's black level and white level to ensure it's performing optimally. The later setting for light output is absolutely crucial to achieving a good screen to print match.
This aspect of monitor set up has not been given the precedence it deserves over the years. Setting a monitor to too high an output level will make prints seem too dark.
We recommend setting an output luminance of around 100cdm² to get the best screen/print matching for most domestic users.
Read our new page just about this issue here: "Why are my prints too dark ?"
Profiling
This is when the output of the screen is measured and a profile built to correct, as far as possible, the monitor's characteristics to a correct standard of display.
As ever with profiling, this process can only adjust output to be as good as it can be on that particular screen. It can't make a poor screen deliver colours it is incapable of.
There are two basic ways of setting monitors up correctly, either using software aids or measuring the exact output with some sort of colour meter.
Software solutions
Many digital imaging programs come with a utility to help set up your computer screen to give the best results. Adobe supply "Adobe Gamma" with Photoshop Elements. In Paint Shop Pro on Windows the monitor gamma utility can be accessed from the File|preferences menu.
Both of these program's utilities work in a similar way. You view a set of coloured squares and adjust the gamma of the image of the screen display until the inner box matches its surround.
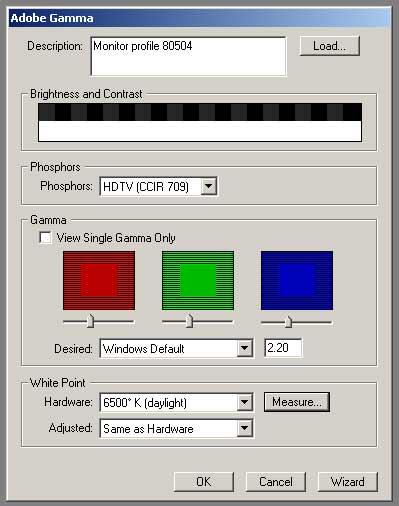
Whilst this appears a simple procedure, care needs to be taken to get the results exactly correct. Once an apparently good setting is reached it is a good idea to stand back from the monitor and see if the boxes are still merged from a distance.
Once you've adjusted your monitor and software as best you can, it's important to ensure that the settings don't change. This is especially important if your system is used by others who may adjust monitor controls without your permission. A small bit of tape over the controls is a wise move.
Apple Mac users running OSX are very well catered for with the Digital Calibrator Assistant, which works in the same way as the above utility only with even more accuracy possible. It can be found as a "Calibrate" option on the color tab of the displays pane, found in system properties.
For a detailed description of software calibration please read Norman Koren's excellent web pages on the subject. His pages include some graphics that help setting up monitors with even greater control. There is also some more useful information and images to assist software calibration at the Lagom LCD monitor test pages
Although it is possible to improve your monitor by good software methods, and it's certainly better than not setting up a monitor at all, however we strongly recommend buying a hardware monitor calibrator and using it to ensure a good reliable image to work with.
Hardware calibration
The most accurate way to set up a monitor is with a dedicated hardware measuring tool that will help you set up the contrast, brightness and colour controls for the best display. Then it measures exactly how the screen displays colour and creates a custom monitor profile that will allow the monitor to deliver the highest quality picture it's capable of.
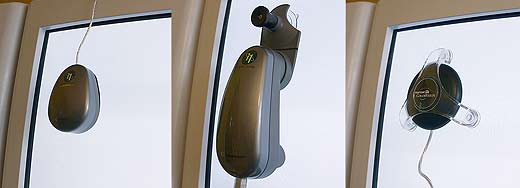
The above illustration shows 3 of the best known hardware calibrators. On the left is the Gretag-MacBeth i Display, centre is the Gretag-MacBeth i Photo and on the right is the Pantone ColorVision Spyder. Each is used with dedicated, easy to use software that makes creating an accurate monitor profile a simple process. One key advantage of using a hardware calibrator is that removes subjectivity from the process to help ensure consistent results from calibration to calibration
We strongly recommend buying a decent hardware calibration system that allows you to set and calibrate to a specific light output, such as an X-Rite display 2 or Colorvision Spyder 3.
Monitor your monitor
It's important to appreciate the set up of a monitor is not a once only task. The controls on the monitor can be knocked, changed by another user, the output of the graphics card can be changed with its software settings and the physical output of a computer monitor screen can change with time too. As a result the monitor should be regularly checked and re-calibrated.
Finally
Use a good monitor.
We are continually amazed that some customers using our service have spent large amounts of money on professional quality cameras, lenses, printers and powerful computers, but then buy cheap monitors that fail to reveal the quality in the rest of their whole imaging system. A good monitor and calibrator is not quickly superceded, so can be a good investment compared to the rapid depreciation of other digital photographic and IT equipment.