How to set up Colour management in image editing and printing software
Image editing programs
Most modern digital imaging programs support colour management to varying degrees. The first step in ensuring your program is correctly set to use colour management is to read the manual or help file supplied with the program. As we all know these are not always as easy to understand as they might be and often assume a more detailed understanding of the issues than many novices possess. So below are some simple instructions to get started for some of the more popular programs.
- Photoshop CS4
- Photoshop CS3
- Photoshop CS2
- Photoshop. Covers versions 5.5, 6 7, CS
- Photoshop Elements 6 & 7
- Photoshop Elements 2, 3, 4
- Picture Window Pro
- Qimage
- Paint Shop Pro
- Corel Photo Paint
- Adobe Lightroom
Printer settings
Once you've set up your editing or printing program correctly, you will need to ensure that your printer driver settings are correct. Please read our printer driver settings page to learn more.
Photoshop CS4
The latest version of Photoshop changes very little in colour management and printing from version CS3
The extras to note are three check boxes under the image preview that give you the ability to soft proof in the print dialogue box.
Photoshop CS3
Photoshop is probably the best and most powerful image editing program available. It has a very complex and powerful set of colour management tools available, but that power also means great care needs to be taken to ensure that the settings do what you expect them to.
Colour settings
This big and intimidating dialogue box is actually quite easy to configure. Please note you will only see all the options if you check the "Advanced Mode" check box at the bottom left of the initial dialogue box offered. It controls what Photoshop does when a file is loaded and edited.
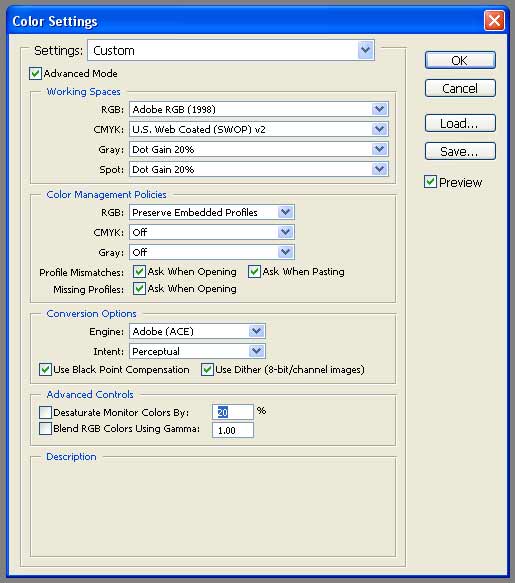
The settings shown in the dialogue box above are a good starting point. It makes Photoshop assume you will use Adobe RGB colourspace, but not carry out any conversions if a file of a different type is loaded. It will ask you if you want to convert to the default Adobe RGB colourspace instead.
If you only intend to work with sRGB files, you ought to change the RGB working space to sRGB instead.
Monitor calibration
Your monitor can be set up using the Adobe Gamma utility installed by default. Read our monitor calibration page for more details on this.
Printing
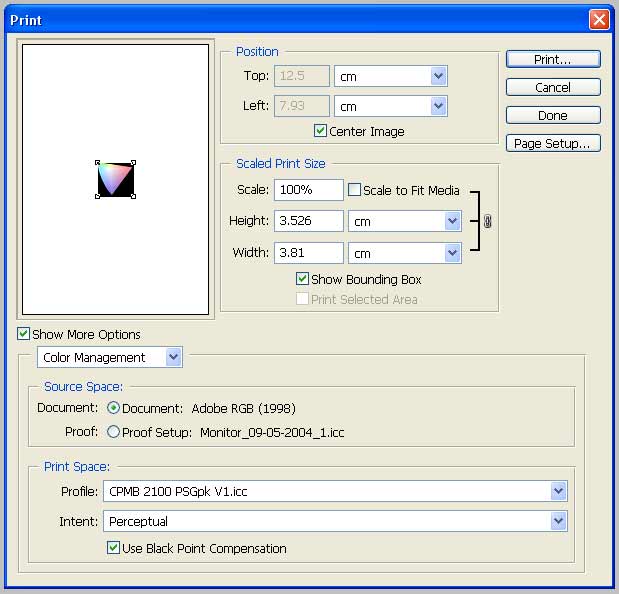
When you need to make a print from Photoshop the best workflow to ensure that the colour management system is doing what you expect is to use the "Print with Preview" option from the File menu, then check the "Show More Options" check box and go to "Color Management" in the drop down box.
You get faced with another big dialogue box, but this one is a lot easier to understand. This is the one you will need to use most often when printing from Photoshop, so it's worth understanding what's going on here.
The latest version of Photoshop CS3 has a new print dialogue to previous versions which is a lot easier to understand.
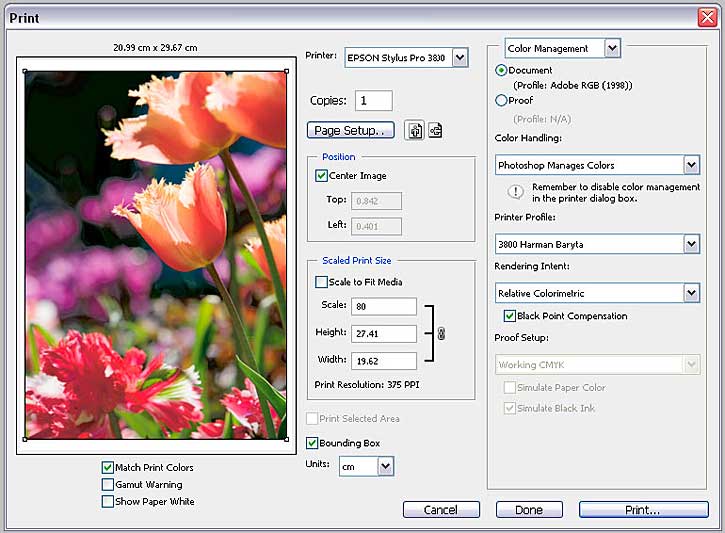
The options that concern us with respect to colour management are on the right hand pane of the window.
Print:
Proof: This will show what, if any, profile is correcting the colour you've been viewing the file with when working with it.
Options:
Printer Profile: This is where you specify the printer profile you will use.
Rendering Intent: We know think that the best choice is "Relative colormetric"
The "Black Point Compensation check box is best selected.
Once you've made the printer settings re-check the Print Space: Profile: option. Many people are caught out that it reverts to its previous setting after the driver settings have been accessed.
Photoshop CS2
Photoshop is probably the best and most powerful image editing program available. It has a very complex and powerful set of colour management tools available, but that power also means great care needs to be taken to ensure that the settings do what you expect them to.
Colour settings
This big and intimidating dialogue box is actually quite easy to configure. Please note you will only see all the options if you check the "Advanced Mode" check box at the bottom left of the initial dialogue box offered. It controls what Photoshop does when a file is loaded and edited.
The settings shown in the dialogue box above are a good starting point. It makes Photoshop assume you will use Adobe RGB colourspace, but not carry out any conversions if a file of a different type is loaded. It will ask you if you want to convert to the default Adobe RGB colourspace instead.
If you only intend to work with sRGB files, you ought to change the RGB working space to sRGB instead.
Monitor calibration
Your monitor can be set up using the Adobe Gamma utility installed by default. Read our monitor calibration page for more details on this.
Printing
When you need to make a print from Photoshop the best workflow to ensure that the colour management system is doing what you expect is to use the "Print with Preview" option from the File menu, then check the "Show More Options" check box and go to "Color Management" in the drop down box.
You get faced with another big dialogue box, but this one is a lot easier to understand. This is the one you will need to use most often when printing from Photoshop, so it's worth understanding what's going on here.
The latest version of Photoshop CS2 has a slightly different print preview dialogue to previous versions which is a little easier to understand.
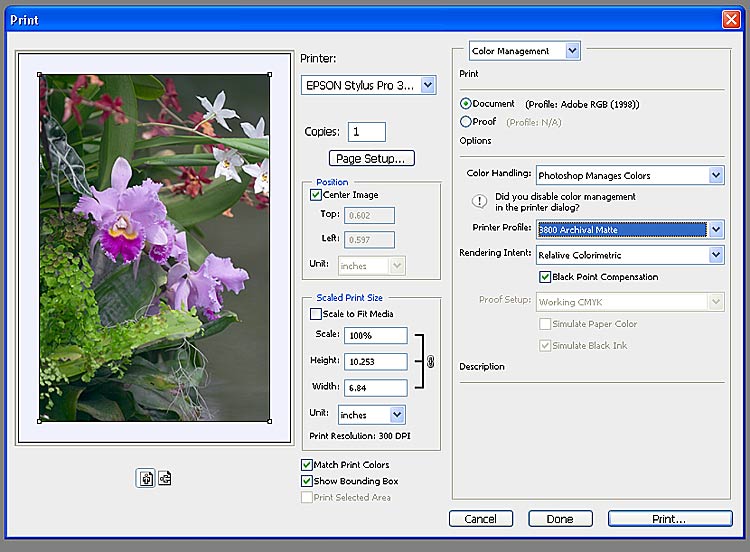
The options that concern us with respect to colour management are the bottom half of the box.
Document: This will show the colourspace you're working in with the image.
Proof: This will show what, if any, profile is correcting the colour you've been viewing the file with when working with it.
Color Handling: This give you the options to either not use colour management at all, allow Photoshop to apply the printer profile or let the printer driver apply the profile. We recommend that printer profiles are applied here rather than with the printer driver as they are easier to manage here.
Printer Profile: This is where you specify the printer profile you will use.
Rendering Intent: For photographs the best choice is "Perceptual"
The "Black Point Compensation check box is best selected.
Once you've made the printer settings re-check the Print Space: Profile: option. Many people are caught out that it reverts to its previous setting after the driver settings have been accessed.
Photoshop versions 4,5,6, CS
Not a lot has changed in Photoshop over the years, which is one reason for it's dominant position as the best image editor available. Most of the above instructions for the latest version CS2 are the same as the older versions, the only significant difference is that the old "Print with Preview" dialogue box was a little less easy to understand.
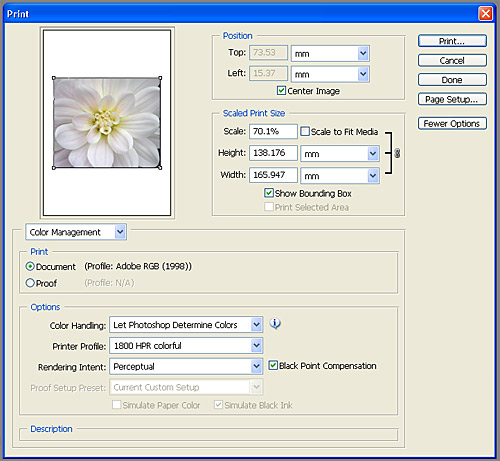
The options that concern us with respect to colour management are the bottom half of the box.
Document: This will show the colourspace you're working in with the image.
Proof: This will show what, if any, profile is correcting the colour you've been viewing the file with when working with it.
Profile: This is where you specify the printer profile you will use.
Intent: For photographs the best choice is "Perceptual"
The "Use Black Point Compensation check box is best selected. You will then need to choose your printer and ensure that it doesn't apply any further colour management.
Once you've made the printer settings re-check the Print Space: Profile: option. Many people are caught out that it reverts to its previous setting after the driver settings have been accessed.
Photoshop Elements 2
Photoshop Elements is an excellent program to start colour management with. It has most of the useful features of the full version of Photoshop, without any of the added complications.
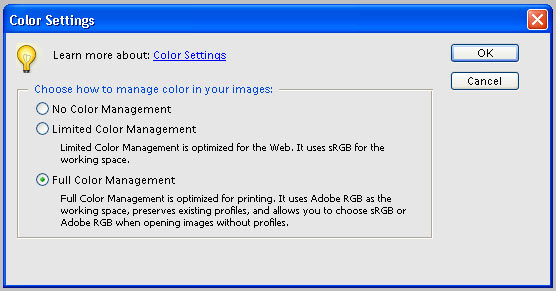
Turn on colour management from the Edit menu; go to Color Settings.
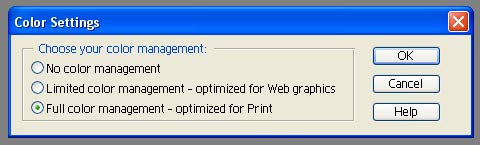
From that dialogue box choose "Full color management - optimised for print"
PE2 can't change the embedded colourspace profile for an image, so just leaves the tag untouched, but will handle all file types correctly as far as we've seen.
Your monitor can be set up using the Adobe Gamma utility installed by default. Read our monitor calibration page for more details on this.
When printing you will be given almost exactly the same options as in the full version of Photoshop, except you won't see the "Proof" option in the "Source Space" box. So please see the instructions for setting up printing with colour management in Photoshop above.
Photoshop Elements 3
Photoshop Elements 3 has the same options as version 2, but does explain itself a little better.
Photoshop Elements 4
Photoshop Elements 4 add another option to its colour management system that allows some choice if working with files with different colourspaces. Useful if you sometimes need to send prints to outside printing labs in sRGB colourspace.
Photoshop Elements 6 & 7
Photoshop Elements is an excellent program to start colour management with. It has most of the useful features of the full version of Photoshop, without any of the added complications.
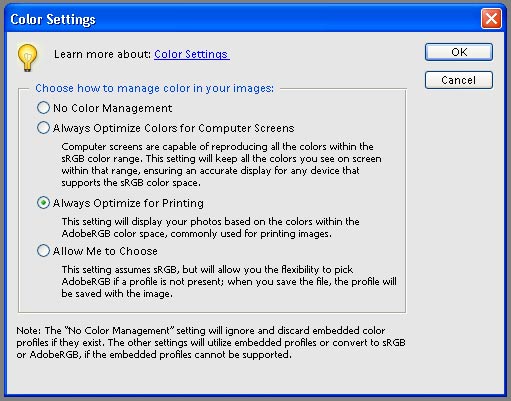
Turn on colour management from the Edit menu; go to Color Settings.
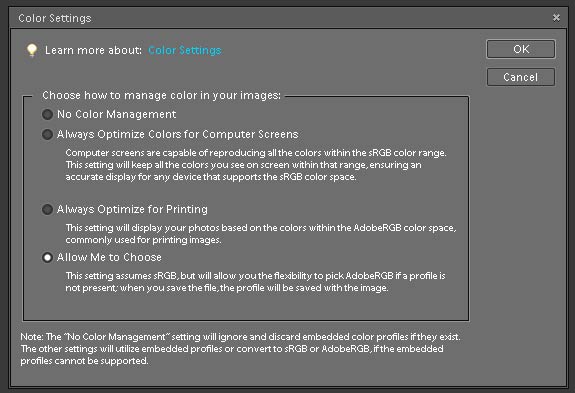
From that dialogue box we recommend choosing "Allow me to choose"
PE6 & 7 can't change the embedded colourspace profile for an image, so just leaves the tag untouched, but will handle all file types correctly as far as we've seen.
Monitor calibration
Your monitor can be set up using the Adobe Gamma utility installed by default. Read our monitor calibration page for more details on this.
Printing
Photoshop Elements 6 & 7 have new print dialogues compared to previous versions which are a lot easier to understand.
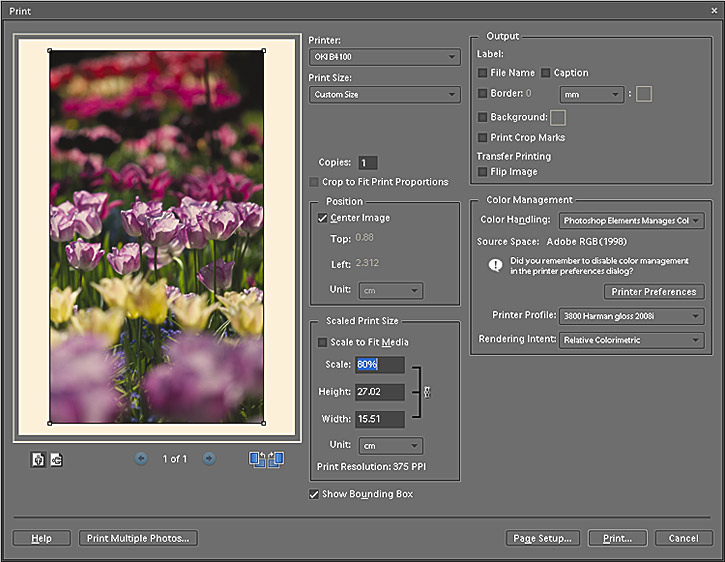
The options that concern us with respect to colour management are on the right hand pane of the window.
Color Management:
Printer Profile: This is where you specify the printer profile you will use.
Rendering Intent: We know think that the best choice is "Relative colormetric"
You will then need to choose your printer and ensure that it doesn't apply any further colour management.
Once you've made the printer settings re-check the Color management: Profile: option. Many people are caught out that can revert to its previous setting after the driver settings have been accessed.
Picture Window Pro
PWP is a lesser known shareware image editing program of surprising power and capability. It has full colour management built into the program that is easy to find and set up.
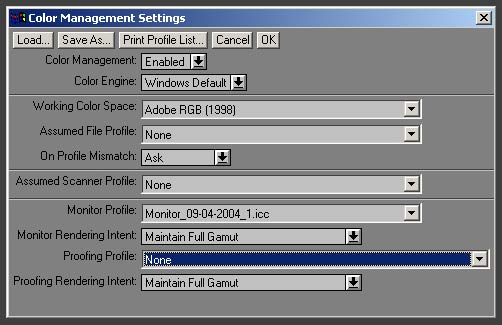
Color engine: Windows default
Working color space: Adobe RGB(1998)
Assumed file profile : None
On profile mismatch: Ask
Assumed scanner profile: None
Monitor profile: (as appropriate)
Monitor rendering intent: maintain Full Gamut
Proofing profile: (This where your printer profile should be set)
Proofing rendering intent: maintain Full Gamut
The settings shown in the dialogue box above are a good starting point. It makes Picture Window Pro assume you will use Adobe RGB colourspace, but not carry out any conversions if a file of a different type is loaded. It will ask you if you want to convert to the default Adobe RGB colourspace instead.
If you only intend to work with sRGB files, you ought to change the RGB working space to sRGB instead.
The page also contains all the printing and proofing values as well, in some ways this feature is an improvement on Adobe's Photoshop.
Qimage
Qimage is another less well known shareware program that provides full colour management when printing. The interface is quite complex at first sight and difficult for novices to easily understand, however it does keep many of the important features, like the colour profiles selected, obviously in view on the main program interface. Once you get to understand how to use colour management you may find Qimage to be a very useful addition for colour managed printing.

Looking at the program window, the colour settings are in the pane in the bottom right hand side marked "Print Processing".
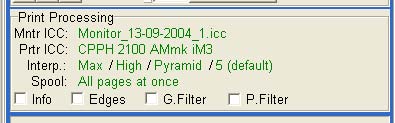
The important settings here for colour management are "Mntr ICC:" which determines what monitor profile is used for proofing and "Prtr ICC" which is where the printer profile set is display. Right clicking on either settings brings up the color management dialogue box, which can also be accessed via the setting menu bar option.
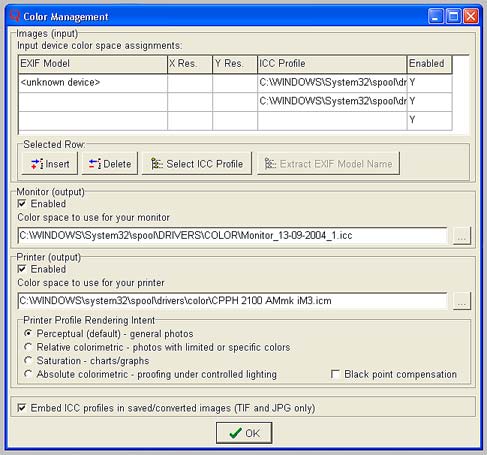
This dialogue box controls all the options available for colour management in Qimage. The box marked "Enabled" should be checked to use printer profiles and the correct one chosen in the "Color space to use in your printer" option. Different profiles can be selected via another dialogue "ICC profile selection" accessed via the button marked "..." at the right hand end of the option box. There you will find you can access all the ICC profiles installed on your system. In this dialogue both the profiles Description and it's file name are shown, some may be different, by ColourProfiles custom profiles will have both the description and file name the same.
Paint Shop Pro
Whilst paint Shop Pro claims to be a fully colour managed program, its implementation leaves very much to be desired. There is also room for confusion as it uses different terms for functions compared to other programs.
The first problems is that it doesn't recognise colourspaces other than sRGB, which may be a major limitation. We have read of people managing to get Paint Shop Pro to offer working in other colourspaces, but it seems totally undocumented.
Paint Shop Pro will also only offer the option of using the default printer's profiles as selected in the main Window's printer properties or those manually added, unlike most other imaging programs which offer any in the main colour profiles folder. So firstly you need to ensure that the printer you wish to print from is set as the system default, then access the color management option on the system printer properties and add any profiles for the printer that haven't been installed at the same time as the printer.
Start button > Setting > Printers and Faxes > right click on the printer you wish to print from > on the color management tab: check that any profiles you wish to print with are associated with the printer and select the manual profile configuration option on the driver.
File > Preferences > Color management > Enable color management;
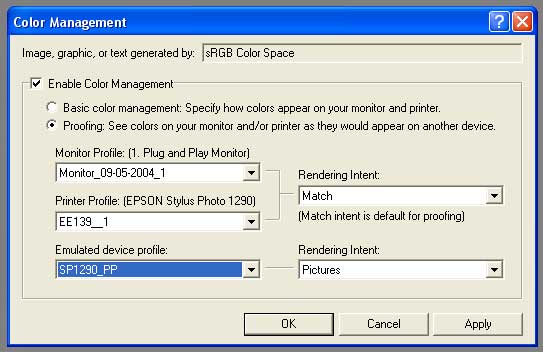
Monitor profile: (as appropriate)
Printer profile: (as appropriate)
Rendering intent: Pictures
Whilst paint Shop Pro is well regarded as an image editor, I'm afraid we can't really recommend it for serious work in a colour managed workflow given these limitations.
Version 9 update
Paint Shop Pro version 9 has seen a very minor change in it's behaviour which is undocumented. It is now possible to access the associated printer profiles of printers other than the default Windows printer. The printer has first to be chosen as the printer to use, then you have to return to the colour management settings and choose the required profile for the chosen printer. Not much of a step forward, especially as the settings aren't retained from session to session, but a small improvement.Version X2 update
Corel Photo Paint
To access Photo Paint's colour management's settings choose "Color Management" from the Tools menu. Corel use an easy to understand graphical interface for colour management shown below, taken from version 12.
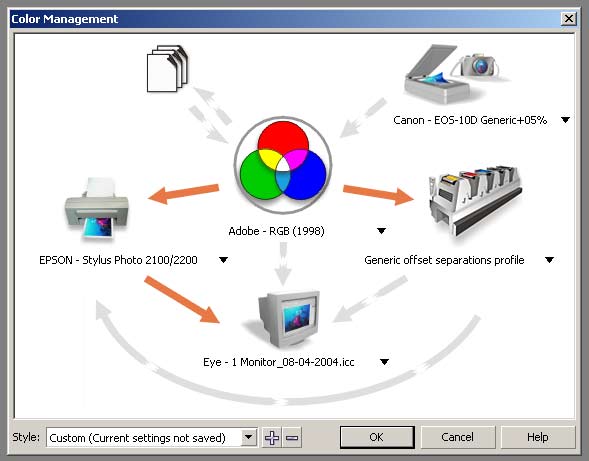
It's all wonderfully self explanatory with option boxes opening when the small arrows are clicked beside the item to be managed.
Adobe Lightroom (all versions)
Adobe Lightroom has some unusual features with respect to colour management. It allows output of converted RAW files in a choice of suitable colourspaces, but always displays the RAW files output in it's own wide gamut colourspace (almost identical to ProPhoto RGB).
It also doesn't have a soft proofing option, so printing directly from Lightroom occasionally can provide unexpected differences in output due to the different colourspaces and profiles involved.
Printing
The Print section of Lightroom is very straight forward with a good range of print controls for sizing and printing multiple prints.
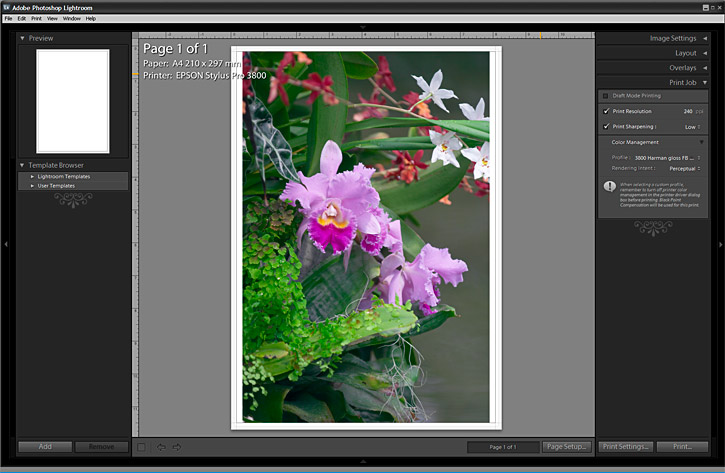
The controls for colour management are in the bottom right drop down panel entitled 'Print Job'.
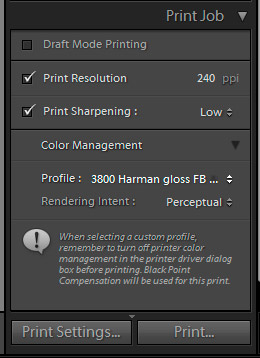
The printer profile can be set by clicking on the double headed arrow at the far right of the Profile: dialogue line.
The following dialogue box allows you get the printer to manage the colour profile, choose a printer profile you have used before, or choose a new profile (other
).
You also have a choice of rendering intents. Given the above mentioned issue of viewing a wide gamut image and not having a soft proofing option, 'Perceptual' rendering intent is likely to provide less unexpected results.
Version 2 also adds different sharpening options for output to matt or gloss paper, but is otherwise the same as the screen shot above from version 1.4